You may want to be notified every time something interesting happens in your workspace. That’s what webhooks are for.
Configure a webhook endpoint
From your workspace’s Developer menu, you can configure the URL you want to be notified on, as well as the events you want to subscribe to.
To create a webhook endpoint, navigate to the Webhook endpoints section and click the Create endpoint button.
Note that only secure URLs are accepted.
The webhook endpoint you just created now displays in your endpoints dashboard.
To know more about all our webhookable events, visit Events.
From the endpoints dashboard, you can view information about each endpoint (name, URL, creation date and success rate of sent webhooks). You can also edit or delete endpoints from the endpoint menu. If you click on an endpoint, you can view its details.
View webhooks
To view all webhooks sent to the configured endpoints, navigate to the Webhooks section.
On the webhooks list, you can see, among other information, their state (whether they were sent correctly or not) and reschedule manually the sending of webhooks that could not be sent. When the system fails to send a webhook, it will retry sending after:
- 1 minute,
- 5 minutes,
- 30 minutes,
- 2 hours,
- 6 hours,
- 24 hours,
- 48 hours.
During all the retry period, the webhook state is pending. If the webhook could not be sent correctly after all retries, its state switches to failed.
Filter webhooks
To refine your search, you filter webhooks:
- by period: select the search format for the period, either Before a specific date or Between two specific dates and enter a date and time,
- by state: you can filter on one or more states among successful, pending or failed webhooks,
- by endpoint: use to retrieve webhooks sent to a specific URL,
- by event type: use to retrieve webhooks sent for a specific event type,
- by event ID: use to retrieve the webhook associated to one specific event.
Display information about a specific webhook
Click on a webhook to view its detailed information.
Each webhook includes:
- details about the webhook itself,
- the delivery log.
Webhook authentication
When Universign sends a webhook, the request body is signed and the signature is added to the request header so you can verify its authenticity and integrity. The signature format used by Universign is JWS (JSON Web Signature) with detached content as described in the RFC7515 standard.
Signature structure
The JWS is added to the webhook request header in the x-jws-signature header field. The JWS has 3 sections:
- The header
- The data
- The signature itself
Note: Since a JWS with detached content is used, the data section is not present in the JWS but corresponds to the request body in JSON format.
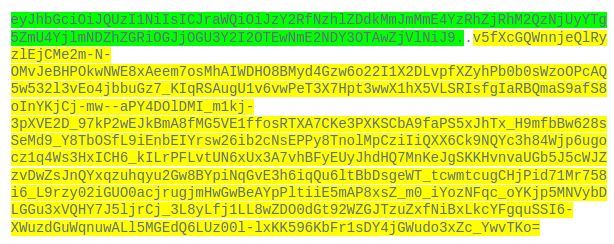
In the example below, the signature as it displays in the request header:
- Highlighted in green is the base64URL-encoded signature header. It contains the algorithm as well as the ID of the public key that was used to sign.
- Between the two dots, the data section is empty and moved in the request body as shown in the screenshot below.
- Highlighted in yellow is the base64URL-encoded signature itself.
The JSON request body:
{
  "object": "event",
  "id": "evt_x7yrPr1rXJBn",
  "type": "transaction.lifecycle.created",
  "payload": {
    "object": {
      "object": "transaction",
      "id": "tx_x7yrPr1a566A",
      "folder_id": "fol_MJQbbKe5PV7d",
      "created_at": "2022-03-15T18:08:16.222Z",
      "started_at": null,
      "closed_at": null,
      "expires_at": null,
      "duration": 20160,
      "name": "tx_x7yrPr1a566A",
      "folder_name": "Mon dossier",
      "stalled": false,
      "language": "fr",
      "sender_name_display": "name_email",
      "creator": {
        "name": "Jane Doe",
        "email": "[email protected]",
        "workspace_name": "My workspace",
        "api_key_name": null
      },
      "state": "draft",
      "participants": [],
      "sealers": [],
      "documents": [],
      "instructions": {
        "sequencing": [],
        "signatures": [],
        "reviews": []
      },
      "actions": [],
      "metadata": {},
      "progress_value": 0,
      "ongoing_conversation": false,
      "has_unread_message": false,
      "origin": "webapp",
      "carbon_copy": [],
      "watchers": [
        "mbr_DDmnn6rrKZa3"
      ],
      "cancel_reason": null,
      "cancel_code": null
    }
  },
  "traceId": null,
  "createdAt": 1647367696.238
}
The input to the signature is the base64URL-encoded signature header concatenated with the base64URL-encoded request body.
How to verify the webhook signature:
1. Retrieve the key ID used by Universign to sign the webhook
To do so, you must decode the signature header from base64URL to JSON. In the decoded header below, the alg parameter corresponds with the algorithm used to sign and the kid parameter with the public key ID you are looking for.
{"alg":"PS256",
"kid":"scd_78ed7d2bf2a8c4af4a3d3652a89fe8b9f46addb8bc8e7cb69106a6467900f5e6"}
Note: PS256 stands for RSASSA-PSS using SHA-256 and MGF1 with SHA-256, as described in RFC7518 chapter 3.1.
2. Retrieve the public key matching this ID
To do so, you need to access the list of public keys used by Universign, available on https://api.alpha.universign.com/v1/webhooks/jwks.json (Alpha) or https://api.universign.com/v1/webhooks/jwks.json (Production).
3. Reconstruct the signed data
Concatenate the base64URL-encoded header with the base64URL-encoded request body as described in RFC7515. The header being already encoded in base64URL, you need to encode the request body in base64URL.
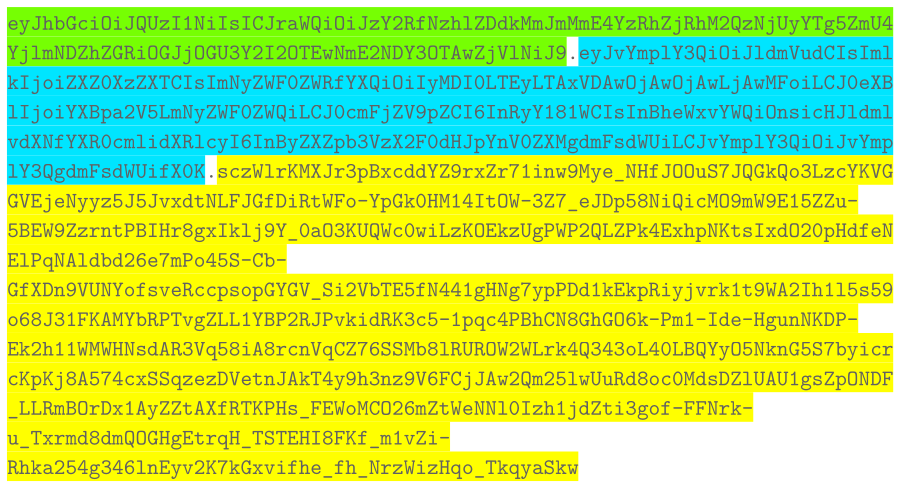
In the example below:
- Highlighted in green and yellow is the base64URL-encoded signature header.
- Highlighted in blue is the base64URL-encoded request body.
You may need some useful links:
Message signature or MAC Computation
Message Signature or MAC Validation
4. Verify the obtained signature value with the public key
Using the algorithm retrieved in step 1, and the public key retrieved in step 2, verify that the data obtained in step 3 corresponds to the data signed in the JWS signature.